[blog_update content=”RPC2RT”]
Ah, the cloud. It’s all the buzz these days. There’s good reason, we’re taking more and more pictures and videos on our devices, which means we’re producing more personal data than ever. We need a place to store and easily access that media. The cloud is just the spot since you can access data stored on it from just about any device. There are two options: use a public cloud service or make your own personal cloud storage.
What is the Cloud?
The cloud sounds like a nebulous place where all your photos, videos, and data are just floating around in the sky. In reality, all that stuff is actually stored on hard drives in different location. For example, if you take a picture on your phone and store it in the cloud, it is saved on a hard drive in a remote location. Sure, you can still have the picture saved in your phone’s memory, but you also have a duplicate of that photo saved to the cloud. So if anything happens to your phone (we know, things happen to phones all the time), you can still access that picture from the cloud on your new phone, tablet or computer.

Which is Better: Using a Personal Cloud or Public Cloud Service?
Think of a personal cloud as a private external hard drive that stores your data which you can access from all your devices (laptop, tablet, smartphone, etc.) when you’re away from home. The benefit here is that it’s only your photos and videos on the drive and you have complete control of how that data is secured. Setting up a personal cloud includes picking out the hard drive to setting up connectivity to securing and managing the data. Depending on how savvy you are, you may have an option for setting up your personal cloud drive at a remote location, separate from your home or office. Chances are you’ll likely set it up in your home. Even the very large 1 terabyte (1TB) hard drives aren’t very big or bulky so there’s plenty of room to store it in your house.
 Building a personal cloud also means if something happens to the drive or software you use to set up and manage the personal cloud, you’re also responsible for repairs. If you don’t use a RAID storage system, which stores the data on multiple drives, then you only have one backup of your precious memories. So if something happens to that drive, then you’re out of luck. You’ll also be responsible for implementing security software to make sure your pictures and videos are secure. It takes a lot of work, but some people prefer to have complete control over their data.
When you use a public cloud service, such as RealCloud, all the work is done for you. The service offers multiple ways to access your data from any device (phone, tablet, computer, TV). You simply upload your content to the cloud and access it anywhere you have an Internet connection. The cloud service manages the hard drives that store the data, they also have multiple drives for redundancy. So if one drive fails, your media is still backed up to another drive. There are teams of people monitoring the data center where your photos and videos are stored and can take care of any issue that may arise.
One thing to understand is that your data is stored along side plenty of other people’s content. That can be something that may make you nervous. Rest assured, these companies have plenty of strategies in place to ensure that only you see your data. If it worries you, create a strong password. Don’t use the same password you use for other accounts, incorporate letters, numbers and characters, and make it at least 12 characters long. Cloud companies also take care of data encryption for more security.
Finally, since your cloud service isn’t physically located in your house, you don’t have to worry about it getting stolen or some other unforeseen event happening to it. While you do need to typically pay a monthly fee for access to a cloud data service, a base amount of free data storage is usually offered in addition to the paid tiers for larger amounts of storage. So you can try out the service, before buying more storage space.
Here’s how to setup a personal cloud at home and how to create an account on a public cloud service. We start with setting up a personal cloud, but if you want to get started creating an account using a cloud service, jump to the section on “How to Setup a Personal Cloud Account with RealCloud.”
How to Make A Personal Cloud
The easiest way to set up a personal cloud is to add a hard drive to your home network. This is referred to as a Network Attached Storage (NAS) device. The good news is that there are products sold that include both the hardware and software needed to make your own personal cloud storage solution. You do need a bit of know-how to customize and sync it to your devices. Since all these solutions are different, we’ll walk you through the steps you can expect once you pick a personal cloud.
The easiest way to set up a personal cloud is to add a hard drive to your home network. This is referred to as a Network Attached Storage (NAS) device. The good news is that there are products sold that include both the hardware and software needed to make your own personal cloud storage solution. You do need a bit of know-how to customize and sync it to your devices. Since all these solutions are different, we’ll walk you through the steps you can expect once you pick a personal cloud.
Pick a Personal Cloud Solution that Works With Your Devices
There are a lot of personal cloud products available such as Western Digital’s My Cloud and LaCie CloudBox. Some personal cloud products come with two drives, which will give you a RAID solution that simultaneously backs up your data on two hard drives. The benefit is that if one drive fails, you still have your pictures and personal documents on the other drive. Each of these solutions includes software to help you get started.The first thing you want to do is make a list of your needs. Here are some things to consider:
How much data do you need? A good rule of thumb is to double the amount you think you’ll need. For reference, 500GB of data will store approximately 8,500 hours of music, 500 hours of video, 155,000 photos and 250 hours of movies.
What devices do you want to use to access your personal cloud? When picking a solution, choose something that works with your devices. So if you have a mix of devices (iPhone, Windows tablet, Android smartphone) make sure the software will work with all of those devices.
Is it compatible with your OS? You’ll need to make sure the included personal cloud software will work with your computer. Check your computer to see what version of the OS (for example, Windows 8 or Mac OS X) it’s running. Then review the specs for the solution you’re going to get and verify it’s compatible with your system.
Setup a Personal Cloud on Your Home Network
Once you select a personal cloud solution, you’ll need to install it on your home network. These are the typical steps you’ll need to follow.
1. Take the NAS drive out of the box and attach it to your router or a network node.
2. Power it up.
3. Open the included software on your computer. You’ll likely have to run installation software first.
4. Open the program and follow the prompts to pick an IP address. You should also be able to name the drive and make a few other customizations such as adjusting the power settings.
5. Next, identify which files you want to backup to the personal cloud. This is a good time to choose how often you want your files backed up.
6. Create your login information. This is what you’ll use to access your personal cloud from other devices.
7. Login to your personal cloud from your smartphone or tablet. (Note: Make sure there’s software or apps included that will work with your devices.) Typically, your personal cloud product will include remote-access software. This is what you’ll use to login to your cloud from other devices.
Personal cloud products can cost from $150 to $300 for a 2TB drive. Although, the software for these solutions is intuitive, you definitely need to have some computer knowledge to setup and maintain them at home. If you want other family members or friends to have access to your personal cloud, you’ll be responsible for setting up accounts for them.
How to Setup a Personal Cloud Account with a Public Cloud Service
When you use a cloud service, you can usually get an account setup in a few minutes. Since these services usually offer some free storage space to get started, you don’t have to figure out how much space you’ll need. You can always add more storage by paying a monthly or annual fee. Prices typically start at $4.99 a month. Once you setup your own personal cloud account, you can easily access your media from multiple devices either via the web or a mobile app. We’ll describe the steps on how to get started with RealCloud:
1. Open a browser, type cloud.real.com in the address bar and complete the required information. You can also sign in with a Facebook account. Note: You can also download the RealCloud app to your PC.
2. You’ll see a few videos that will walk you through how to use RealCloud. You can start uploading videos immediately. Simply drag videos from your computer to the Upload Videos icon at the top of the screen.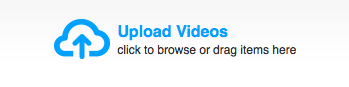
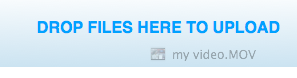
3. When you see the Drop Files Here to Upload text, release the mouse button and watch them upload. You’ll be able to see the progress as the video uploads.
4. Once you have videos uploaded to your personal cloud in RealCloud, you can share them. Click the video you want to share and check the box in the upper left corner of the video image and click Share in the top navigation bar. A pop-up window will appear. Enter the email address of the recipient and add a message and click the blue Share button. (Note: You can also share to social media sites) They’ll receive an email with the video embedded. The person who received the video presses play to watch it.
Making Your Own Personal Cloud Will Give You Access to Your Media on Any Device
When picking a personal cloud solution choose an option that will be easy for you to manage. Both methods offer security; so think about how much you really want to be involved in keeping your data safe. If you opt for setting up a personal cloud on your home network get at least a drive with 1TB of data. You don’t want to have to get a new solution because you fill up your drive too quickly. You’ll be surprised how much space media can occupy. For those considering a cloud service, look for a company that has some longevity. The last thing you want is to upload all your data to find out the company is going out of business. Although, you may end up needing to purchase more storage space from a cloud service provider you’ll be happy to learn that prices for online storage have only gone down over time. Whether you choose to setup a personal cloud privately in your home using a NAS solution or sign up with a cloud service provider, you’ll be able to access your media on your devices whenever you want. You’ll also have the piece of mind that your precious memories are securely backed up.